How to Antique Furniture With Paint and Stain?
Published on: May 11, 2025 | Last Updated: January 7, 2025
Written By: Sarah McClintock
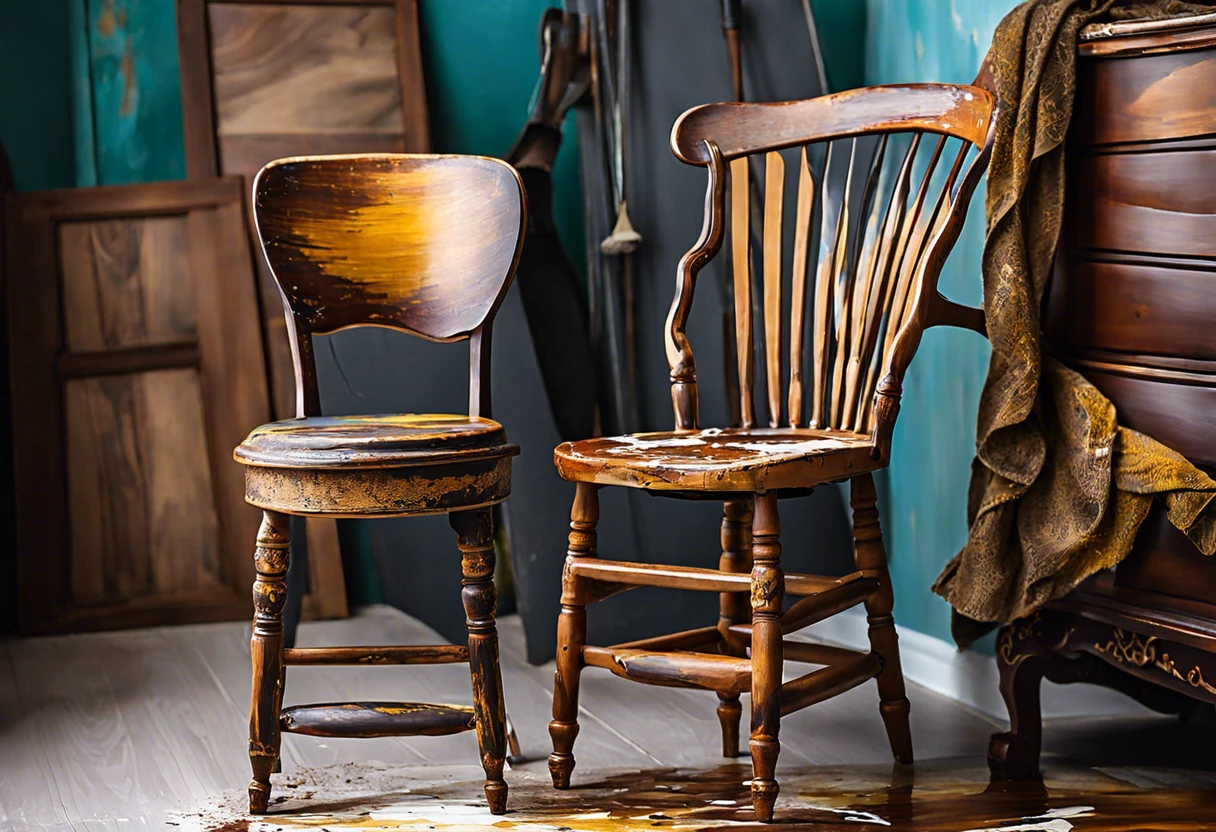
Antique furniture is old furniture that tells stories. It often has unique shapes and marks, making it special and beautiful.
Learning how to antique furniture with paint and stain is super important. I’ve done it myself, and following the right steps makes all the difference in getting that perfect aged charm.
In this guide, you’ll discover important preparations before you start, a step-by-step method for antiquing furniture with paint and stain, suitable colors, types of paint, possible issues, finishing touches, and creative DIY ideas. We’ll explore how to make paint look old and faded, and how to paint an antique look that will wow your friends!
Contents
- 1 How to Antique Furniture With Paint and Stain?
- 2 What is Antique Furniture?
- 3 Important Preparations Before You Start Your Antique Furniture Project
- 4 Step-by-step Guide to Antiquing Furniture With Paint and Stain
- 5 Recommended Color Palette for Antiquing Furniture
- 6 Understanding the Aging Process in Furniture
- 7 The Role of Texture in Antiquing
- 8 Types Of Paint and Stain Suitable for Antiquing Furniture
- 9 Factors Affecting the Antiquing Process
- 10 Common Issues While Antiquing Furniture With Paint and Stain
- 11 Finishing Touches for Your Antiqued Furniture
- 12 Creative DIY Project Ideas for Antiquing Furniture
- 13 Additional Techniques for Antiquing Furniture
- 14 Frequently Asked Questions About Antiquing Furniture With Paint and Stain
- 15 Conclusion
- 16 Additional Resources
How to Antique Furniture With Paint and Stain?
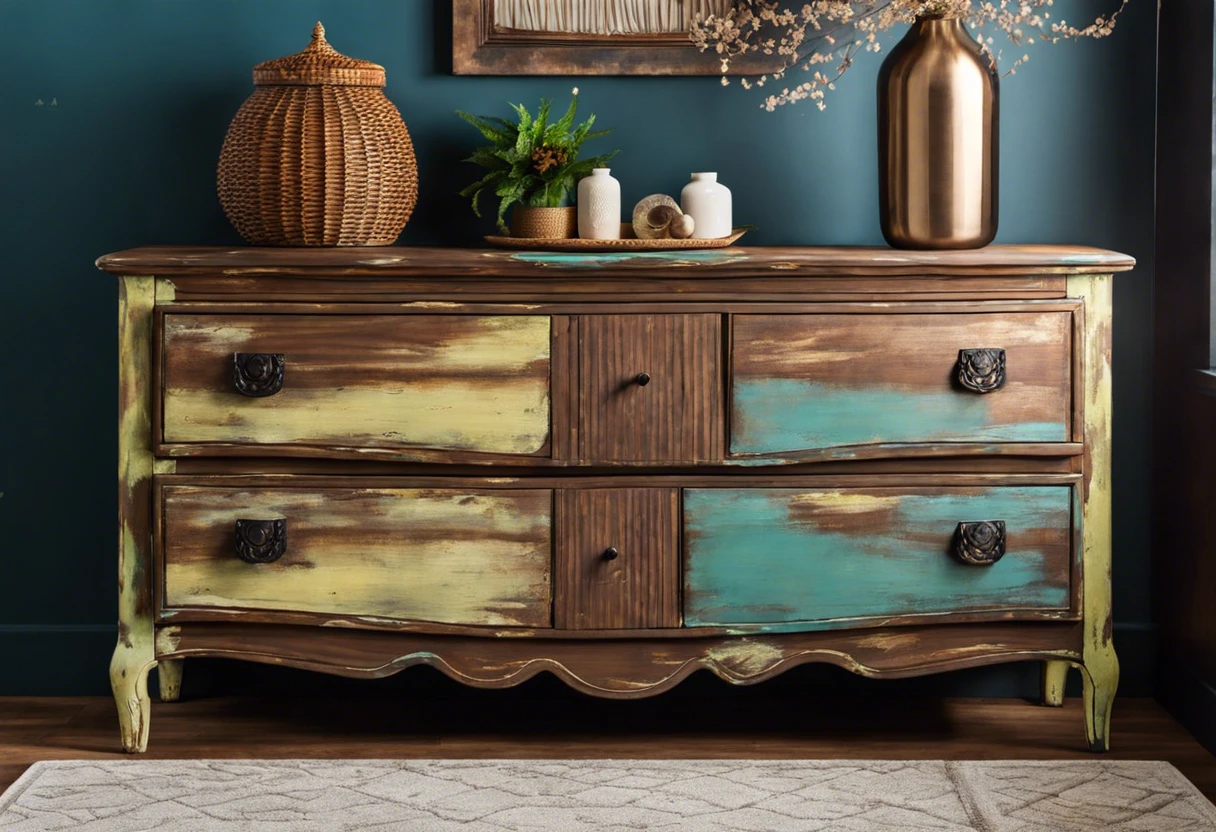
To antique furniture, start by sanding the piece. Apply a base coat, then use a darker stain or glaze for an aged effect. Wipe off excess to reveal the paint beneath. If you’re considering using acrylic paint for this technique, you might want to explore specific painting techniques for leather. Finally, seal with a clear coat for protection.
What is Antique Furniture?
Antique furniture refers to items at least 100 years old. These pieces showcase exceptional craftsmanship and reflect historical styles, making them valuable collectibles.
To enhance the vintage charm, many people explore how to antique furniture with paint and stain. I’ve dabbled in this and found that layering colors brought out the aged character of my pieces. When working with different finishes, it’s crucial to protect your surfaces from potential damage like bleach 💰 Save on Clorox Concentrated Bleach → stains that could compromise your restoration efforts protecting painted surfaces carefully.
A friend of mine used this technique when restoring her grandmother’s old desk. It was fascinating to see how a rustic look added warmth and history to the wood, emphasizing not just the finish but the generations of stories it holds. For anyone curious, learning how to achieve an antique look with paint can breathe new life into old treasures.
Important Preparations Before You Start Your Antique Furniture Project
What do you need to get started?
- Quality Sandpaper 💰 Save on Assorted Grit Sandpaper → : Use 120-grit 3M sandpaper. It’s essential for smoothing the surface before painting.
- Wood Primer: Choose Zinsser BIN shellac-based primer. It helps paint adhere better and provides a lasting finish.
- Furniture Paint: Opt for Annie Sloan chalk paint. This type gives a lovely aged look after distressing.
- Glaze: Consider Valspar antiquing glaze. This adds depth and makes the paint look worn.
- Protective Sealant: Use Varathane water-based polyurethane. It protects the finish and enhances durability.
That covers essential preparations for your antique furniture project. Let’s now take a look at the step-by-step guide to antiquing.
Also See: What Does It Cost to Paint Kitchen Cabinets?
Step-by-step Guide to Antiquing Furniture With Paint and Stain
Here are the steps to transform your furniture into an antique look using paint and stain.
-
Prepare the Surface Of the Furniture
Start by cleaning the furniture thoroughly to remove dust and grease. Use a damp cloth with mild soap, then let it dry completely for about 30 minutes to ensure good adhesion.
If the surface is glossy, lightly sand it with 220-grit sandpaper for better paint grip. This step prevents peeling and guarantees a durable finish.
-
Select the Right Paint and Stain
Choose a high-quality latex or chalk paint for your base coat to achieve a rustic feel. Dark colors like deep brown or navy provide depth.
Next, select a compatible stain, preferably an oil-based gel for durability. This not only enhances the details but also deepens the vintage look.
-
Apply the Base Coat
Grab your brush and load it with paint! Use long, smooth strokes to cover every nook and cranny of the furniture evenly, allowing one hour of drying time between coats.
I usually apply two coats for better coverage. My secret? Use a foam brush for edges; it helps reach corners without leaving streaks.
-
Apply the Stain for an Antique Effect
Now, grab your stain and a clean cloth. For the antique look, gently rub the stain over the painted surface, focusing on details like carvings and grooves. Allow about 15-30 minutes for absorption. If you want to enhance your project’s durability, you might want to explore baking techniques for painted crafts.
Wipe off excess stain to control the color intensity. Experiment; you can always add more, but removing too much can be tricky!
-
Seal With a Protective Finish
Once you’re satisfied with the stain, apply a clear sealer to protect your work and enhance durability. A matte polyacrylic finish is ideal to maintain the authentic antique appearance.
Allow 24 hours to dry before using the furniture. This layered finish adds luster and protects against everyday wear and tear.
We have now covered a step-by-step approach to antiquing furniture using paint and stain. Next, we will explore a recommended color palette.
Recommended Color Palette for Antiquing Furniture
For a timeless look, I highly recommend the “Vintage Rust” palette; these colors harmonize beautifully to create a warm, inviting atmosphere.
| Color Box | Hex Code | Color Name |
|---|---|---|
| #7B4B24 | Burnt Umber | |
| #D9CBBF | Faded Beige | |
| #A8B8A8 | Sage Green |
You should now have a good understanding of selecting a color palette for antiquing furniture. In the next part, we’ll discuss the aging process in furniture.
Understanding the Aging Process in Furniture
Grasping how furniture naturally ages can enhance your antiquing skills.
- Climate Exposure: Sunlight and humidity play significant roles. Pieces left outside may develop cracks and faded colors.
- Material Types: Different woods age uniquely. For instance, oak develops a deep patina over the years, while pine can turn a soft yellow.
- Wear and Tear: Regular use adds character. Areas frequently touched will wear down faster, creating a natural distressed look.
We’ve wrapped up the aging process in furniture here. Let us turn our attention to the impact of texture in antiquing.
The Role of Texture in Antiquing
Texture is everything in antiquing. It adds depth and helps create a more realistic impression of age.
- Distressing: Techniques like sanding or scraping simulate wear.
- Layering: Use different paint textures to create visual interest and mimic age.
- Natural Wood Grain: Try to preserve and highlight the original grain for an authentic look.
Types Of Paint and Stain Suitable for Antiquing Furniture
Let’s explore types of paint and stain great for antiquing: chalk paint, milk paint, gel stain, and metallic paint.
-
Chalk Paint
Chalk paint is creamy and easy to use. It’s perfect for creating a vintage look with minimal prep work. You’ll achieve old-world charm without sacrificing time!
-
Milk Paint
Milk paint provides a natural finish that’s flexible. It can create a distressed (Worn) appearance when mixed with a bonding agent or water, making your furniture feel authentically aged.
-
Gel Stain
Gel stain delivers rich color while preserving wood grain detail. Imported from Europe, it offers control and an even finish, suitable for projects needing a rustic touch.
-
Metallic Paint
If you want shimmer, opt for metallic paint! This type adds glamour and gives wooden furniture a sleek, antique sheen that stands out.
Through years of practice, I’ve found that chalk paint is my favorite. It applies easily, hides imperfections, and enhances the character of old wood.
Factors Affecting the Antiquing Process
What factors influence your approach to distressing furniture’s appearance and texture?
-
Type of Paint: Choosing chalk or milk paint can produce a lovely vintage finish.
-
Stain Color: Lighter stains create an aged look, while dark stains add depth.
-
Application Technique: Layering and distressing techniques help achieve a perfect weathered effect.
-
Sealants Used: The right sealant protects your antique look from wear and tear.
Common Issues While Antiquing Furniture With Paint and Stain
My friend struggled to achieve that perfect aged look. Using too much stain made the wood dark—like an oil spill! Instead, she diluted it 50% with mineral spirits for a softer, weathered finish.
Another issue? Uneven paint application. To fix this, she used a nylon brush with synthetic bristles, ensuring smooth, even strokes with minimal drips. It made a world of difference!
Finishing Touches for Your Antiqued Furniture
After your project, apply furniture wax every 3-6 months. A natural product like Minwax Paste Finishing Wax (10 Fl Oz/0.296 L) prevents damage and enhances your piece’s antique charm.
Inspect for uneven stains and sharp edges. Check closely for imperfections every 12 inches (30.48 Cm) to ensure beauty; I use the Guardsman Wood Repair Kit for minor dings.
From one expert to another, layer high-quality acrylic gel medium with 25% (By Volume) mineral spirits for added depth. This technique gives your furniture a striking realism.
Creative DIY Project Ideas for Antiquing Furniture
Wanna make your furniture shine with a touch of history? Try creating a distressed farmhouse table or a vintage chest of drawers with a personalized twist!
To tackle these projects, I’d grab some wood glue, sandpaper, and a palette of earthy paints. Materials will run you about $50-$100, and set aside a weekend—around 5 to 10 hours of fun work should do the trick. When handling paint materials, I always take precautions to protect my skin from chemical absorption.
Looking for alternatives? Try using a homemade wash of white paint and water for a soft, aged look. You can also experiment with coffee or tea stains to create a unique, worn-in hue—trust me, it’s magical!
Additional Techniques for Antiquing Furniture
Want to take your antiquing skills to the next level? Check out these clever techniques.
Layering Techniques for Depth
Layering different colors can create stunning depth. Here’s how to do it:
- Base Layer: Start with a light color as your base coat.
- Middle Layer: Apply a mid-tone color on top and distress it lightly to expose some of the base layer.
- Top Layer: Finish with a darker color to accentuate details. Sand areas where wear would naturally occur to reveal the layers beneath.
Using Stencils for Patterns
Want to add some flair? Use stencils!
- Choose a pattern that reflects vintage style, like florals or geometric shapes.
- Use a light coat of paint or glaze to mimic a faded, worn design.
- Position the stencil carefully and use a sponge brush for precise application.
Creating a Patina Effect
Achieve the aged metal look with a simple technique:
- Apply a layer of copper or bronze paint, allowing it to dry completely.
- Then, add a green patina glaze or spray to mimic oxidation.
- This technique creates a more textured and authentic antique feel.
| Technique | Description | Ideal For |
|---|---|---|
| Layering | Adds depth with multiple color layers for a complex look. | Weak wood grain visibility |
| Stenciling | Enhances pieces with vintage patterns for personalization. | Decoration without heavy distressing |
| Patina | Mimics aged metal for a unique rustic touch. | Furniture needing a bold statement |
These techniques will help you achieve truly unique and personalized antiqued furniture that tells your own story!
Frequently Asked Questions About Antiquing Furniture With Paint and Stain
What Supplies Do I Need to Antique Furniture?
To antique furniture, you’ll need specific supplies. Essential items include primer, chalk paint, stain, paintbrushes, fine sandpaper, and clear sealant. Typically, these supplies cost between $30 to $70 USD, making it affordable for most DIY enthusiasts.
How Long Does the Antiquing Process Take?
Most people want to know: how long does the antiquing process take? The entire process usually takes 4 to 6 hours, but you’ll also need drying time, often favoring 24 hours for the best results.
Can I Antique Furniture Without Sanding?
Yes, you can antique furniture without sanding. Use chalk paint instead, as it adheres well without the need for sanding. This method saves you time and effort while achieving a great antiqued look. If you’re curious about mixing different paint types for your project, paint compatibility techniques can provide additional creative options.
What Type Of Paint Works Best for Antiquing?
The best type of paint for interior painting techniques is chalk paint. This variety offers a flat finish, which mimics aged wood. Unlike regular paint, chalk paint bonds easily and can create that vintage appeal we all love.
How Do I Maintain My Antiqued Furniture?
To maintain your antiqued furniture, keep it clean with a damp cloth and avoid harsh chemicals. Regular dusting helps preserve the finish, ensuring it remains beautiful for years. Simple care keeps your piece looking fresh. If you’re interested in refinishing or painting wooden surfaces, you might want to explore painting techniques for furniture.
Can I Use Spray Paint for Antiquing Furniture?
Yes, you can use spray paint for antiquing furniture. Spray paint allows for an even coat and quick application compared to traditional methods. Just ensure you choose a high-quality spray paint specifically designed for furniture refinishing techniques. If you’re looking to transform your furniture’s appearance, you might also want to refinish other surfaces like bathroom vanities.
Should I Use Sealant After Antiquing My Furniture?
Absolutely, using a sealant after antiquing is crucial. A clear sealant protects the finish from wear and enhances durability, especially in high-traffic areas. A good sealant can prolong the life of your beautifully antiqued piece.
Can I Antique Furniture With Two Different Paint Colors?
Yes, you can definitely antique furniture with two different paint colors! Layering colors can add depth and character. This technique allows you to create a unique look by exposing the bottom color in selected areas. If you’re looking to master the art of creating stunning vintage finishes, acrylic paint techniques work perfectly.
How Much Should I Charge for Antiqued Furniture?
If you’re selling antiqued furniture, I’d recommend charging between $100 to $500 USD, depending on size and craftsmanship. Unique pieces that showcase great technique often command higher prices.
Also See: Can You Paint Grout Lines? Transform Your Space!
Conclusion
We covered how to antique furniture with paint and stain, what antique furniture is, the important preparations, a step-by-step guide, a recommended color palette, suitable types of paint and stain, factors affecting the antiquing process, common issues, finishing touches, and creative DIY project ideas.
In summary, you can easily give your furniture an aged appearance through various techniques and products. If you seek more guidance, I’m here to provide insights on creating an old and faded paint look, achieving a rustic or vintage style, and much more!
To explore more techniques, please visit Paint Answers.